二进制部署kuberneters v1.20
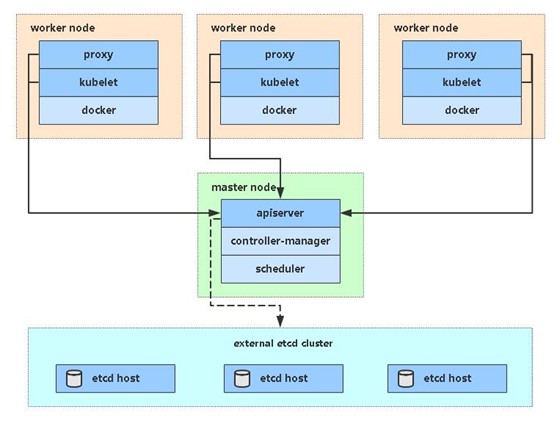
整体结构
此教程部署一台单master节点(2个从节点)的集群
软件环境
软件 版本 操作系统 centos7.9 容器引擎 docker-CE 1.9 kubernetes kubernetes v1.20 整体规划
角色 ip 组件 k8s-01 172.16.8.47 kube-apiserver, kube-controller-manager, kube-schedeler, docker, etcd k8s-02 172.16.8.48 kubelet, kube-proxy, docker, etcd k8s-03 172.16.8.49 kubelet, kube-proxy, docker, etcd 单master结构图
操作系统初始化配置
1
2
3
4
5
6
7
8
9
10
11
12
13
14
15
16
17
18
19
20
21
22
23
24
25
26
27
28
29
30
31
32
33
#关闭防火墙
systemctl stop firewalld
systemctl disabled firewalld
#关闭selinux
setenforce 0 #临时关闭
sed -i 's@enforcing@disabled@' /etc/selinux/config # 永久关闭
#关闭swap
swapoff -a #临时关闭
sed -i 's@.*swap.*@#&@' /etc/fstab #永久关闭
#根据规划设置主机名
hostnamectl set-hostname k8s-01 #以此类推
#添加hosts
cat >> /etc/hosts << EOF
172.16.8.49 k8s-03
172.16.8.48 k8s-02
172.16.8.47 k8s-01
EOF
#将桥接的ipv4流量传递到iptables的链
cat > /etc/sysctl.d/k8s.conf << EOF
net.bridge.bridge-nf-call-ip6tables = 1
net.bridge.bridge-nf-call-iptables = 1
EOF
sysctl --system #生效
#同步时间
yum install ntpdate -y
ntpdate time.windows.com
部署Etcd集群
etcd是一个分布式键值存储系统, kubeernetes使用etcd进行数据库存储, 所以先准备一个etcd数据库,为解决etcd单点故障,一般采用集群方式部署, 这是使用3台机器组件集群,可容忍一台故障
| 节点名称 | ip |
| —| — |
| etcd-1 | 172.16.8.47 |
| etcd-2 | 172.16.8.48 |
| etcd-3 | 172.16.8.49 |
准备 cfssl 证书生成工具
cfssl 是一个开源的证书管理工具, 使用json 文件生成证书, 相比openssl更方便使用,如下使用k8s-01节点操作:
1
2
3
4
5
6
7
wget https://pkg.cfssl.org/R1.2/cfssl_linux-amd64
wget https://pkg.cfssl.org/R1.2/cfssljson_linux-amd64
wget https://pkg.cfssl.org/R1.2/cfssl-certinfo_linux-amd64
chmod +x cfssl_linux-amd64 cfssljson_linux-amd64 cfssl-certinfo_linux-amd64
mv cfssl_linux-amd64 /usr/local/bin/cfssl
mv cfssljson_linux-amd64 /usr/local/bin/cfssljson
mv cfssl-certinfo_linux-amd64 /usr/bin/cfssl-certinfo生成etcd证书
自签证书颁发机构(CA)
创建工作目录:
1
2
3
4
mkdir -p ~/TLS/{etcd,k8s}
cd ~/TLS/etcd自签CA:
1
2
3
4
5
6
7
8
9
10
11
12
13
14
15
16
17
18
19
20
21
22
23
24
25
26
27
28
29
30
31
32
33
34
35
36
37
38
cat > ca-config.json << EOF
{
"signing": {
"default": {
"expiry": "87600h"
},
"profiles": {
"www": {
"expiry": "87600h",
"usages": [
"signing",
"key encipherment",
"server auth",
"client auth"
]
}
}
}
}
EOF
cat > ca-csr.json << EOF
{
"CN": "etcd CA",
"key": {
"algo": "rsa",
"size": 2048
},
"names": [
{
"C": "CN",
"L": "Beijing",
"ST": "Beijing"
}
]
}
EOF生成证书:
1
cfssl gencert -initca ca-csr.json | cfssljson -bare ca -会生成ca.pem 和 ca-key.pem 文件
使用自签CA签发etcd https证书
创建证书申请文件:1
2
3
4
5
6
7
8
9
10
11
12
13
14
15
16
17
18
19
20
21
22cat > server-csr.json << EOF
{
"CN": "etcd",
"hosts": [
"172.16.8.47",
"172.16.8.48",
"172.16.8.49",
"172.16.8.50"
],
"key": {
"algo": "rsa",
"size": 2048
},
"names": [
{
"C": "CN",
"L": "BeiJing",
"ST": "BeiJing"
}
]
}
EOF注: 上述文件hosts字段中ip为所有etcd节点的集群通信ip,一个都不能少, 为了方便后期扩容,可以多写几个预留的ip生成证书:
1
cfssl gencert -ca=ca.pem -ca-key=ca-key.pem -config=ca-config.json -profile=www server-csr.json | cfssljson -bare server会生成servre.pem 和 server-key.pem文件
从github下载二进制文件
下载地址:https://github.com/etcd-io/etcd/releases/download/v3.4.9/etcd-v3.4.9-linux-amd64.tar.gz
部署etcd集群 (为简化操作,所以操作在k8s-01上面完成,稍后拷贝到2-3节点)
创建工作目录并解压二进制包
1
2
3
4mkdir /opt/etcd/{bin,cfg,ssl} -p
tar zxvf etcd-v3.4.9-linux-amd64.tar.gz
mv etcd-v3.4.9-linux-amd64/{etcd,etcdctl} /opt/etcd/bin/创建etcd配置文件
1
2
3
4
5
6
7
8
9
10
11
12
13
14
15cat > /opt/etcd/cfg/etcd.conf << EOF
#[Member]
ETCD_NAME="etcd-1"
ETCD_DATA_DIR="/var/lib/etcd/default.etcd"
ETCD_LISTEN_PEER_URLS="https://172.16.8.47:2380"
ETCD_LISTEN_CLIENT_URLS="https://172.16.8.47:2379"
#[Clustering]
ETCD_INITIAL_ADVERTISE_PEER_URLS="https://172.16.8.47:2380"
ETCD_ADVERTISE_CLIENT_URLS="https://172.16.8.47:2379"
ETCD_INITIAL_CLUSTER="etcd-1=https://172.16.8.47:2380,etcd-2=https://172.16.8.48:2380,etcd-3=https://172.16.8.49:2380"
ETCD_INITIAL_CLUSTER_TOKEN="etcd-cluster"
ETCD_INITIAL_CLUSTER_STATE="new"
EOF- ETCD_NAME:节点名称,集群中唯一
- ETCD_DATA_DIR:数据目录
- ETCD_LISTEN_PEER_URLS:集群通信监听地址
- ETCD_LISTEN_CLIENT_URLS:客户端访问监听地址
- ETCD_INITIAL_ADVERTISE_PEERURLS:集群通告地址
- ETCD_ADVERTISE_CLIENT_URLS:客户端通告地址
- ETCD_INITIAL_CLUSTER:集群节点地址
- ETCD_INITIALCLUSTER_TOKEN:集群Token
- ETCD_INITIALCLUSTER_STATE:加入集群的当前状态,new是新集群,existing表示加入已有集群
systemctl 管理etcd
1
2
3
4
5
6
7
8
9
10
11
12
13
14
15
16
17
18
19
20
21
22
23
24
25cat > /usr/lib/systemd/system/etcd.service << EOF
[Unit]
Description=Etcd Server
After=network.target
After=network-online.target
Wants=network-online.target
[Service]
Type=notify
EnvironmentFile=/opt/etcd/cfg/etcd.conf
ExecStart=/opt/etcd/bin/etcd \
--cert-file=/opt/etcd/ssl/server.pem \
--key-file=/opt/etcd/ssl/server-key.pem \
--peer-cert-file=/opt/etcd/ssl/server.pem \
--peer-key-file=/opt/etcd/ssl/server-key.pem \
--trusted-ca-file=/opt/etcd/ssl/ca.pem \
--peer-trusted-ca-file=/opt/etcd/ssl/ca.pem \
--logger=zap
Restart=on-failure
LimitNOFILE=65536
[Install]
WantedBy=multi-user.target
EOF拷贝刚才生成的证书
1
cp ~/TLS/etcd/ca*pem ~/TLS/etcd/server*pem /opt/etcd/ssl/启动并设置开机启动
1
2
3
4systemctl daemon-reload
systemctl start etcd
systemctl enable etcd将上面节点1所有生成的文件拷贝到节点2和节点3(不熟练ansible 可以使用scp拷贝)
1
2
3
4
5
6
7
8
9
10
11
12
13
14
15
16
17
18
19ansible node -m copy -a "src=/opt/etcd dest=/opt/"
ansible node -m copy -a "src=/usr/lib/systemd/system/etcd.service dest=/usr/lib/systemd/system/"
```
然后在节点2和节点3 分别修改 `etcd.conf` 配置文件中的节点名称和当前服务器IP
```bash
vim /opt/etcd/cfg/etcd.conf
#[Member]
ETCD_NAME="etcd-1" # 修改此处,节点2改为etcd-2,节点3改为etcd-3
ETCD_DATA_DIR="/var/lib/etcd/default.etcd"
ETCD_LISTEN_PEER_URLS="https://172.16.8.47:2380" # 修改此处为当前服务器IP
ETCD_LISTEN_CLIENT_URLS="https://172.16.8.47:2379" # 修改此处为当前服务器IP
#[Clustering]
ETCD_INITIAL_ADVERTISE_PEER_URLS="https://172.16.8.47:2380" # 修改此处为当前服务器IP
ETCD_ADVERTISE_CLIENT_URLS="https://172.16.8.47:2379" # 修改此处为当前服务器IP
ETCD_INITIAL_CLUSTER="etcd-1=https://172.16.8.47:2380,etcd-2=https://172.16.8.48:2380,etcd-3=https://172.16.8.49:2380"
ETCD_INITIAL_CLUSTER_TOKEN="etcd-cluster"
ETCD_INITIAL_CLUSTER_STATE="new"最后启动etcd并设置开机自动启动,同上
查看集群状态
1
2
3
4
5
6
7
8
9
10ETCDCTL_API=3 /opt/etcd/bin/etcdctl --cacert=/opt/etcd/ssl/ca.pem --cert=/opt/etcd/ssl/server.pem --key=/opt/etcd/ssl/server-key.pem --endpoints="https://172.16.8.47:2379,https://172.16.8.48:2379,https://172.16.8.49:2379" endpoint health --write-out=table
+--------------------------+--------+-------------+-------+
| ENDPOINT | HEALTH | TOOK | ERROR |
+--------------------------+--------+-------------+-------+
| https://172.16.8.47:2379 | true | 12.747616ms | |
| https://172.16.8.49:2379 | true | 13.041258ms | |
| https://172.16.8.48:2379 | true | 13.438598ms | |
+--------------------------+--------+-------------+-------+如果输出以后信息,说明集群部署成功, 如果有问题先看日志
/var/log/message 或 journalctl -u etcd
安装docker
略
部署k8s-01节点(master)
生成kube-apiserver证书
自签颁发机构(CA)
1
2
3
4
5
6
7
8
9
10
11
12
13
14
15
16
17
18
19
20
21
22
23
24
25
26
27
28
29
30
31
32
33
34
35
36
37
38
39
40
41
42cd ~/TLS/k8s
cat > ca-config.json << EOF
{
"signing": {
"default": {
"expiry": "87600h"
},
"profiles": {
"kubernetes": {
"expiry": "87600h",
"usages": [
"signing",
"key encipherment",
"server auth",
"client auth"
]
}
}
}
}
EOF
cat > ca-csr.json << EOF
{
"CN": "kubernetes",
"key": {
"algo": "rsa",
"size": 2048
},
"names": [
{
"C": "CN",
"L": "Beijing",
"ST": "Beijing",
"O": "k8s",
"OU": "System"
}
]
}
EOF生成证书
1
cfssl gencert -initca ca-csr.json | cfssljson -bare ca -会生成ca.pem 和 ca-key.pem 文件
使用自签CA 签发kube-apiserver HTTPS 证书
创建证书申请文件
1
2
3
4
5
6
7
8
9
10
11
12
13
14
15
16
17
18
19
20
21
22
23
24
25
26
27
28
29
30
31cat > server-csr.json << EOF
{
"CN": "kubernetes",
"hosts": [
"10.0.0.1",
"127.0.0.1",
"172.16.8.47",
"172.16.8.48",
"172.16.8.49",
"172.16.8.50",
"kubernetes",
"kubernetes.default",
"kubernetes.default.svc",
"kubernetes.default.svc.cluster",
"kubernetes.default.svc.cluster.local"
],
"key": {
"algo": "rsa",
"size": 2048
},
"names": [
{
"C": "CN",
"L": "BeiJing",
"ST": "BeiJing",
"O": "k8s",
"OU": "System"
}
]
}
EOF注: 上述文件hosts字段中的IP为所有master ,node 节点的ip 一个都不能少,为了后期方便扩容,可以多写几个ip 已做预留生成证书
1
cfssl gencert -ca=ca.pem -ca-key=ca-key.pem -config=ca-config.json -profile=kubernetes server-csr.json | cfssljson -bare server会生成server.pem 和 server-key.pem 文件
从github下载二进制文件
下载地址: https://github.com/kubernetes/kubernetes/blob/master/CHANGELOG/CHANGELOG-1.20.md
注:打开链接你会发现里面有很多包,下载一个server包就够了,包含了Master和Worker Node二进制文件。解压二进制包
1
2
3
4
5
6mkdir -p /opt/kubernetes/{bin,cfg,ssl,logs}
tar zxvf kubernetes-server-linux-amd64.tar.gz
cd kubernetes/server/bin
cp kube-apiserver kube-scheduler kube-controller-manager /opt/kubernetes/bin
cp kubectl /usr/bin/部署kube-apiserver
创建配置文件
1
2
3
4
5
6
7
8
9
10
11
12
13
14
15
16
17
18
19
20
21
22
23
24
25
26
27
28
29
30
31
32
33
34
35
36
37
38
39
40
41
42
43
44
45
46
47
48
49
50
51
52
53
54
55
56
57
58
59
60
61
62
63
64
65
66
67
68
69cat > /opt/kubernetes/cfg/kube-apiserver.conf << EOF
KUBE_APISERVER_OPTS="--logtostderr=false \\
--v=2 \\
--log-dir=/opt/kubernetes/logs \\
--etcd-servers=https://172.16.8.47:2379,https://172.16.8.48:2379,https://172.16.8.49:2379 \\
--bind-address=172.16.8.47 \\
--secure-port=6443 \\
--advertise-address=172.16.8.47 \\
--allow-privileged=true \\
--service-cluster-ip-range=10.0.0.0/24 \\
--enable-admission-plugins=NamespaceLifecycle,LimitRanger,ServiceAccount,ResourceQuota,NodeRestriction \\
--authorization-mode=RBAC,Node \\
--enable-bootstrap-token-auth=true \\
--token-auth-file=/opt/kubernetes/cfg/token.csv \\
--service-node-port-range=0-32767 \\
--kubelet-client-certificate=/opt/kubernetes/ssl/server.pem \\
--kubelet-client-key=/opt/kubernetes/ssl/server-key.pem \\
--tls-cert-file=/opt/kubernetes/ssl/server.pem \\
--tls-private-key-file=/opt/kubernetes/ssl/server-key.pem \\
--client-ca-file=/opt/kubernetes/ssl/ca.pem \\
--service-account-key-file=/opt/kubernetes/ssl/ca-key.pem \\
--service-account-issuer=api \\
--service-account-signing-key-file=/opt/kubernetes/ssl/server-key.pem \\
--etcd-cafile=/opt/etcd/ssl/ca.pem \\
--etcd-certfile=/opt/etcd/ssl/server.pem \\
--etcd-keyfile=/opt/etcd/ssl/server-key.pem \\
--requestheader-client-ca-file=/opt/kubernetes/ssl/ca.pem \\
--proxy-client-cert-file=/opt/kubernetes/ssl/server.pem \\
--proxy-client-key-file=/opt/kubernetes/ssl/server-key.pem \\
--requestheader-allowed-names=kubernetes \\
--requestheader-extra-headers-prefix=X-Remote-Extra- \\
--requestheader-group-headers=X-Remote-Group \\
--requestheader-username-headers=X-Remote-User \\
--enable-aggregator-routing=true \\
--audit-log-maxage=30 \\
--audit-log-maxbackup=3 \\
--audit-log-maxsize=100 \\
--audit-log-path=/opt/kubernetes/logs/k8s-audit.log"
EOF
```
`注: 上面\ \ 第一个转义, 第二个是换行符, 使用转义符是为了使用EOF保留换行符 `
* --logtostderr:启用日志
* ---v:日志等级
* --log-dir:日志目录
* --etcd-servers:etcd集群地址
* --bind-address:监听地址
* --secure-port:https安全端口
* --advertise-address:集群通告地址
* --allow-privileged:启用授权
* --service-cluster-ip-range:Service虚拟IP地址段
* --enable-admission-plugins:准入控制模块
* --authorization-mode:认证授权,启用RBAC授权和节点自管理
* --enable-bootstrap-token-auth:启用TLS bootstrap机制
* --token-auth-file:bootstrap token文件
* --service-node-port-range:Service nodeport类型默认分配端口范围 建议改成 从0开始
* --kubelet-client-xxx:apiserver访问kubelet客户端证书
* --tls-xxx-file:apiserver https证书
* 1.20版本必须加的参数:--service-account-issuer --service-account-signing-key-file
* --etcd-xxxfile:连接Etcd集群证书
* --audit-log-xxx:审计日志
* 启动聚合层相关配置:--requestheader-client-ca-file,--proxy-client-cert-file,--proxy-client-key-file,--requestheader-allowed-names,--requestheader-extra-headers-prefix,--requestheader-group-headers,--requestheader-username-headers,--enable-aggregator-routing
2. 拷贝刚才生成的证书
把刚才生成的证书拷贝到配置文件中的路径
```bash
cp ~/TLS/k8s/ca*pem ~/TLS/k8s/server*pem /opt/kubernetes/ssl/启用 TLS Bootstrapping 机制
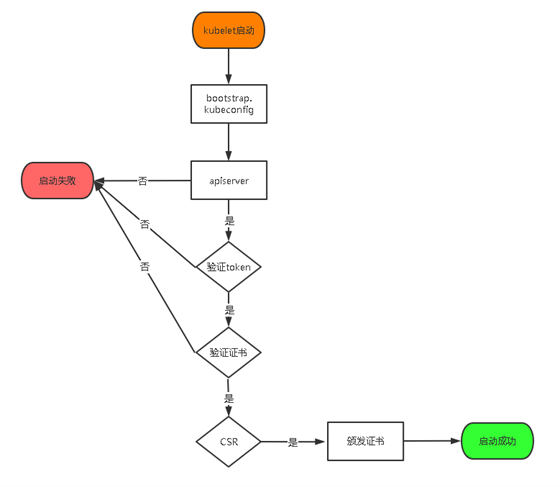
TLS Bootstraping : master apiserver 启用 TLS 认证后吗 Node 节点 kublet 和 kube-proxy 要与 kube-apiserver 进行通信, 必须使用 CA 签发的有效证书才可以, 当 Node 节点很多时, 这种客户端证书颁发需要大量工作,同样也会增加集群扩展复杂度,为了简化流程, Kubernetes 引入了 TLS Bootstrapping 机制来自动颁发客户端证书, kubelet 会以一个底权限用户自动向apiserver申请证书, kubelet的证书由apiserver 动态签署, 所以强烈建议在 Node 上使用这种方式, 目前主要用于 kubelet, kube-proxy 还是由我们统一颁发一个证书TLS Bootstraping 工作流程:
创建上述配置文件中 token 文件:
1
2
3cat > /opt/kubernetes/cfg/token.csv << EOF
c47ffb939f5ca36231d9e3121a252940,kubelet-bootstrap,10001,"system:node-bootstrapper"
EOF格式: token, 用户名 , uid , 用户组
token 也可自行生成替换:1
head -c 16 /dev/urandom | od -An -t x | tr -d ' 'systemctl 管理 apiserver
1
2
3
4
5
6
7
8
9
10
11
12
13
14cat > /usr/lib/systemd/system/kube-apiserver.service << EOF
[Unit]
Description=Kubernetes API Server
Documentation=https://github.com/kubernetes/kubernetes
[Service]
EnvironmentFile=/opt/kubernetes/cfg/kube-apiserver.conf
ExecStart=/opt/kubernetes/bin/kube-apiserver \$KUBE_APISERVER_OPTS
Restart=on-failure
[Install]
WantedBy=multi-user.target
EOF启动并设置开机启动
1
2
3
4systemctl daemon-reload
systemctl start kube-apiserver
systemctl enable kube-apiserver
部署kebe-controller-manager
创建配置文件
1
2
3
4
5
6
7
8
9
10
11
12
13
14
15
16
17cat > /opt/kubernetes/cfg/kube-controller-manager.conf << EOF
KUBE_CONTROLLER_MANAGER_OPTS="--logtostderr=false \\
--v=2 \\
--log-dir=/opt/kubernetes/logs \\
--leader-elect=true \\
--kubeconfig=/opt/kubernetes/cfg/kube-controller-manager.kubeconfig \\
--bind-address=127.0.0.1 \\
--allocate-node-cidrs=true \\
--cluster-cidr=10.244.0.0/16 \\
--service-cluster-ip-range=10.0.0.0/24 \\
--cluster-signing-cert-file=/opt/kubernetes/ssl/ca.pem \\
--cluster-signing-key-file=/opt/kubernetes/ssl/ca-key.pem \\
--root-ca-file=/opt/kubernetes/ssl/ca.pem \\
--service-account-private-key-file=/opt/kubernetes/ssl/ca-key.pem \\
--cluster-signing-duration=87600h0m0s"
EOF- –kubeconfig:连接apiserver配置文件
- –bind-address : 当部署promethres的时候 这一项改成 0.0.0.0 不然promethres获取不到kebe-controller-manager的信息
- –leader-elect:当该组件启动多个时,自动选举(HA)
- –cluster-signing-cert-file/–cluster-signing-key-file:自动为kubelet颁发证书的CA,与apiserver保持一致
2. 生产kubeconfig 文件
生成kube-controller-manager证书
1
2
3
4
5
6
7
8
9
10
11
12
13
14
15
16
17
18
19
20
21
22
23
24
25
26
27
# 切换工作目录
cd ~/TLS/k8s
# 创建证书请求文件
cat > kube-controller-manager-csr.json << EOF
{
"CN": "system:kube-controller-manager",
"hosts": [],
"key": {
"algo": "rsa",
"size": 2048
},
"names": [
{
"C": "CN",
"L": "BeiJing",
"ST": "BeiJing",
"O": "system:masters",
"OU": "System"
}
]
}
EOF
# 生成证书
cfssl gencert -ca=ca.pem -ca-key=ca-key.pem -config=ca-config.json -profile=kubernetes kube-controller-manager-csr.json | cfssljson -bare kube-controller-manager
生成kubeconfig文件,(以下是shell命令 直接在终端执行)
1
2
3
4
5
6
7
8
9
10
11
12
13
14
15
16
17
18
19
KUBE_CONFIG="/opt/kubernetes/cfg/kube-controller-manager.kubeconfig"
KUBE_APISERVER="https://172.16.8.47:6443"
kubectl config set-cluster kubernetes \
--certificate-authority=/opt/kubernetes/ssl/ca.pem \
--embed-certs=true \
--server=${KUBE_APISERVER} \
--kubeconfig=${KUBE_CONFIG}
kubectl config set-credentials kube-controller-manager \
--client-certificate=./kube-controller-manager.pem \
--client-key=./kube-controller-manager-key.pem \
--embed-certs=true \
--kubeconfig=${KUBE_CONFIG}
kubectl config set-context default \
--cluster=kubernetes \
--user=kube-controller-manager \
--kubeconfig=${KUBE_CONFIG}
kubectl config use-context default --kubeconfig=${KUBE_CONFIG}
3. systemctl 管理 controller-manager
1
2
3
4
5
6
7
8
9
10
11
12
13
14
cat > /usr/lib/systemd/system/kube-controller-manager.service << EOF
[Unit]
Description=Kubernetes Controller Manager
Documentation=https://github.com/kubernetes/kubernetes
[Service]
EnvironmentFile=/opt/kubernetes/cfg/kube-controller-manager.conf
ExecStart=/opt/kubernetes/bin/kube-controller-manager \$KUBE_CONTROLLER_MANAGER_OPTS
Restart=on-failure
[Install]
WantedBy=multi-user.target
EOF
4. 启动并设置开机启动
1
2
3
4
systemctl daemon-reload
systemctl start kube-controller-manager
systemctl enable kube-controller-manager
5. 部署kube-scheduler
1. 创建配置文件
1
2
3
4
5
6
7
8
9
cat > /opt/kubernetes/cfg/kube-scheduler.conf << EOF
KUBE_SCHEDULER_OPTS="--logtostderr=false \\
--v=2 \\
--log-dir=/opt/kubernetes/logs \\
--leader-elect \\
--kubeconfig=/opt/kubernetes/cfg/kube-scheduler.kubeconfig \\
--bind-address=127.0.0.1"
EOF
* --kubeconfig:连接apiserver配置文件
* --leader-elect:当该组件启动多个时,自动选举(HA)
* --bind-address: 部署promethres的时候 需要设置 0.0.0.0
2. 生成kube-scheduler证书
1
2
3
4
5
6
7
8
9
10
11
12
13
14
15
16
17
18
19
20
21
22
23
24
25
26
27
28
29
30
31
32
33
34
35
36
37
38
39
40
41
42
43
44
45
46
47
48
49
50
# 切换工作目录
cd ~/TLS/k8s
# 创建证书请求文件
cat > kube-scheduler-csr.json << EOF
{
"CN": "system:kube-scheduler",
"hosts": [],
"key": {
"algo": "rsa",
"size": 2048
},
"names": [
{
"C": "CN",
"L": "BeiJing",
"ST": "BeiJing",
"O": "system:masters",
"OU": "System"
}
]
}
EOF
# 生成证书
cfssl gencert -ca=ca.pem -ca-key=ca-key.pem -config=ca-config.json -profile=kubernetes kube-scheduler-csr.json | cfssljson -bare kube-scheduler
```
生成kubeconfig文件(以下是shell命令,直接在终端执行)
```bash
KUBE_CONFIG="/opt/kubernetes/cfg/kube-scheduler.kubeconfig"
KUBE_APISERVER="https://172.16.8.47:6443"
kubectl config set-cluster kubernetes \
--certificate-authority=/opt/kubernetes/ssl/ca.pem \
--embed-certs=true \
--server=${KUBE_APISERVER} \
--kubeconfig=${KUBE_CONFIG}
kubectl config set-credentials kube-scheduler \
--client-certificate=./kube-scheduler.pem \
--client-key=./kube-scheduler-key.pem \
--embed-certs=true \
--kubeconfig=${KUBE_CONFIG}
kubectl config set-context default \
--cluster=kubernetes \
--user=kube-scheduler \
--kubeconfig=${KUBE_CONFIG}
kubectl config use-context default --kubeconfig=${KUBE_CONFIG}
2. systemd管理scheduler
1
2
3
4
5
6
7
8
9
10
11
12
13
14
cat > /usr/lib/systemd/system/kube-scheduler.service << EOF
[Unit]
Description=Kubernetes Scheduler
Documentation=https://github.com/kubernetes/kubernetes
[Service]
EnvironmentFile=/opt/kubernetes/cfg/kube-scheduler.conf
ExecStart=/opt/kubernetes/bin/kube-scheduler \$KUBE_SCHEDULER_OPTS
Restart=on-failure
[Install]
WantedBy=multi-user.target
EOF
3. 启动并设置开机启动
1
2
3
4
systemctl daemon-reload
systemctl start kube-scheduler
systemctl enable kube-scheduler
4. 查看集群状态
`生成kubectl连接集群的证书 `
1
2
3
4
5
6
7
8
9
10
11
12
13
14
15
16
17
18
19
20
21
22
23
cat > admin-csr.json <<EOF
{
"CN": "admin",
"hosts": [],
"key": {
"algo": "rsa",
"size": 2048
},
"names": [
{
"C": "CN",
"L": "BeiJing",
"ST": "BeiJing",
"O": "system:masters",
"OU": "System"
}
]
}
EOF
#生成证书
cfssl gencert -ca=ca.pem -ca-key=ca-key.pem -config=ca-config.json -profile=kubernetes admin-csr.json | cfssljson -bare admin
生产kubeconfig证书
1
2
3
4
5
6
7
8
9
10
11
12
13
14
15
16
17
18
19
20
21
mkdir /root/.kube
KUBE_CONFIG="/root/.kube/config"
KUBE_APISERVER="https://172.16.8.47:6443"
kubectl config set-cluster kubernetes \
--certificate-authority=/opt/kubernetes/ssl/ca.pem \
--embed-certs=true \
--server=${KUBE_APISERVER} \
--kubeconfig=${KUBE_CONFIG}
kubectl config set-credentials cluster-admin \
--client-certificate=./admin.pem \
--client-key=./admin-key.pem \
--embed-certs=true \
--kubeconfig=${KUBE_CONFIG}
kubectl config set-context default \
--cluster=kubernetes \
--user=cluster-admin \
--kubeconfig=${KUBE_CONFIG}
kubectl config use-context default --kubeconfig=${KUBE_CONFIG}
通过kubectl 查看当前集群的组件状态
1
2
3
4
5
6
7
Warning: v1 ComponentStatus is deprecated in v1.19+
NAME STATUS MESSAGE ERROR
controller-manager Healthy ok
scheduler Healthy ok
etcd-1 Healthy {"health":"true"}
etcd-2 Healthy {"health":"true"}
etcd-0 Healthy {"health":"true"}
如上输出说明master节点组件运行正常
5. `授权kubelet-bootstrap用户允许请求证书`
1
2
3
4
kubectl create clusterrolebinding kubelet-bootstrap \
--clusterrole=system:node-bootstrapper \
--user=kubelet-bootstrap
部署node 节点
这步操作还是在master上面操作, 视master为一个主节点
创建工作目录并拷贝二进制文件
1
mkdir -p /opt/kubernetes/{bin,cfg,ssl,logs}拷贝配置文件
1
2cd kubernetes/server/bin
cp kubelet kube-proxy /opt/kubernetes/bin #本地拷贝部署 kubelet
创建配置文件
1
2
3
4
5
6
7
8
9
10
11
12
13cat > /opt/kubernetes/cfg/kubelet.conf << EOF
KUBELET_OPTS="--logtostderr=false \\
--v=2 \\
--log-dir=/opt/kubernetes/logs \\
--hostname-override=k8s-01 \\
--network-plugin=cni \\
--kubeconfig=/opt/kubernetes/cfg/kubelet.kubeconfig \\
--bootstrap-kubeconfig=/opt/kubernetes/cfg/bootstrap.kubeconfig \\
--config=/opt/kubernetes/cfg/kubelet-config.yml \\
--cert-dir=/opt/kubernetes/ssl \\
--pod-infra-container-image=lizhenliang/pause-amd64:3.0"
EOF–hostname-override:显示名称,集群中唯一
–network-plugin:启用CNI
–kubeconfig:空路径,会自动生成,后面用于连接apiserver
–bootstrap-kubeconfig:首次启动向apiserver申请证书
–config:配置参数文件
–cert-dir:kubelet证书生成目录
–pod-infra-container-image:管理Pod网络容器的镜像
配置参数文件
1
2
3
4
5
6
7
8
9
10
11
12
13
14
15
16
17
18
19
20
21
22
23
24
25
26
27
28
29
30
31
32
33cat > /opt/kubernetes/cfg/kubelet-config.yml << EOF
kind: KubeletConfiguration
apiVersion: kubelet.config.k8s.io/v1beta1
address: 0.0.0.0
port: 10250
readOnlyPort: 10255
cgroupDriver: cgroupfs
clusterDNS:
- 10.0.0.2
clusterDomain: cluster.local
failSwapOn: false
authentication:
anonymous:
enabled: false
webhook:
cacheTTL: 2m0s
enabled: true
x509:
clientCAFile: /opt/kubernetes/ssl/ca.pem
authorization:
mode: Webhook
webhook:
cacheAuthorizedTTL: 5m0s
cacheUnauthorizedTTL: 30s
evictionHard:
imagefs.available: 15%
memory.available: 100Mi
nodefs.available: 10%
nodefs.inodesFree: 5%
maxOpenFiles: 1000000
maxPods: 110
EOF
生成kubelet初次加入集群引导kubeconfig文件
1
2
3
4
5
6
7
8
9
10
11
12
13
14
15
16
17
18
19KUBE_CONFIG="/opt/kubernetes/cfg/bootstrap.kubeconfig"
KUBE_APISERVER="https://172.16.8.47:6443" # apiserver IP:PORT
TOKEN="c47ffb939f5ca36231d9e3121a252940" # 与token.csv里保持一致
# 生成 kubelet bootstrap kubeconfig 配置文件
kubectl config set-cluster kubernetes \
--certificate-authority=/opt/kubernetes/ssl/ca.pem \
--embed-certs=true \
--server=${KUBE_APISERVER} \
--kubeconfig=${KUBE_CONFIG}
kubectl config set-credentials "kubelet-bootstrap" \
--token=${TOKEN} \
--kubeconfig=${KUBE_CONFIG}
kubectl config set-context default \
--cluster=kubernetes \
--user="kubelet-bootstrap" \
--kubeconfig=${KUBE_CONFIG}
kubectl config use-context default --kubeconfig=${KUBE_CONFIG}systemd管理kubelet
1
2
3
4
5
6
7
8
9
10
11
12
13
14
15cat > /usr/lib/systemd/system/kubelet.service << EOF
[Unit]
Description=Kubernetes Kubelet
After=docker.service
[Service]
EnvironmentFile=/opt/kubernetes/cfg/kubelet.conf
ExecStart=/opt/kubernetes/bin/kubelet \$KUBELET_OPTS
Restart=on-failure
LimitNOFILE=65536
[Install]
WantedBy=multi-user.target
EOF设置并设置开机自启
1
2
3systemctl daemon-reload
systemctl start kubelet
systemctl enable kubelet批准kubelet证书申请并加入集群
1
2
3
4
5
6
7
8
9
10
11
12
13# 查看kubelet证书请求
kubectl get csr
NAME AGE SIGNERNAME REQUESTOR CONDITION
node-csr-uCEGPOIiDdlLODKts8J658HrFq9CZ--K6M4G7bjhk8A 6m3s kubernetes.io/kube-apiserver-client-kubelet kubelet-bootstrap Pending
# 批准申请
kubectl certificate approve node-csr-uCEGPOIiDdlLODKts8J658HrFq9CZ--K6M4G7bjhk8A
# 查看节点
kubectl get node
NAME STATUS ROLES AGE VERSION
k8s-01 NotReady <none> 7s v1.18.3注: 由于网络插件还没有部署,节点会没有准备就绪 NotReady部署kube-proxy
创建配置文件
1
2
3
4
5
6
7cat > /opt/kubernetes/cfg/kube-proxy.conf << EOF
KUBE_PROXY_OPTS="--logtostderr=false \\
--v=2 \\
--log-dir=/opt/kubernetes/logs \\
--config=/opt/kubernetes/cfg/kube-proxy-config.yml"
EOF
配置参数文件
1
2
3
4
5
6
7
8
9
10
11cat > /opt/kubernetes/cfg/kube-proxy-config.yml << EOF
kind: KubeProxyConfiguration
apiVersion: kubeproxy.config.k8s.io/v1alpha1
bindAddress: 0.0.0.0
metricsBindAddress: 0.0.0.0:10249
clientConnection:
kubeconfig: /opt/kubernetes/cfg/kube-proxy.kubeconfig
hostnameOverride: k8s-master1
clusterCIDR: 10.0.0.0/24
EOF生成kube-proxy.kubeconfig 文件
1
2
3
4
5
6
7
8
9
10
11
12
13
14
15
16
17
18
19
20
21
22
23
24
25
26
27# 切换工作目录
cd ~/TLS/k8s
# 创建证书请求文件
cat > kube-proxy-csr.json << EOF
{
"CN": "system:kube-proxy",
"hosts": [],
"key": {
"algo": "rsa",
"size": 2048
},
"names": [
{
"C": "CN",
"L": "BeiJing",
"ST": "BeiJing",
"O": "k8s",
"OU": "System"
}
]
}
EOF
# 生成证书
cfssl gencert -ca=ca.pem -ca-key=ca-key.pem -config=ca-config.json -profile=kubernetes kube-proxy-csr.json | cfssljson -bare kube-proxy生成kubeconfig文件
1
2
3
4
5
6
7
8
9
10
11
12
13
14
15
16
17
18
19KUBE_CONFIG="/opt/kubernetes/cfg/kube-proxy.kubeconfig"
KUBE_APISERVER="https://172.16.8.47:6443"
kubectl config set-cluster kubernetes \
--certificate-authority=/opt/kubernetes/ssl/ca.pem \
--embed-certs=true \
--server=${KUBE_APISERVER} \
--kubeconfig=${KUBE_CONFIG}
kubectl config set-credentials kube-proxy \
--client-certificate=./kube-proxy.pem \
--client-key=./kube-proxy-key.pem \
--embed-certs=true \
--kubeconfig=${KUBE_CONFIG}
kubectl config set-context default \
--cluster=kubernetes \
--user=kube-proxy \
--kubeconfig=${KUBE_CONFIG}
kubectl config use-context default --kubeconfig=${KUBE_CONFIG}
systemd管理kube-proxy
1
2
3
4
5
6
7
8
9
10
11
12
13
14
15cat > /usr/lib/systemd/system/kube-proxy.service << EOF
[Unit]
Description=Kubernetes Proxy
After=network.target
[Service]
EnvironmentFile=/opt/kubernetes/cfg/kube-proxy.conf
ExecStart=/opt/kubernetes/bin/kube-proxy \$KUBE_PROXY_OPTS
Restart=on-failure
LimitNOFILE=65536
[Install]
WantedBy=multi-user.target
EOF启动并设置开机启动
1
2
3
4systemctl daemon-reload
systemctl start kube-proxy
systemctl enable kube-proxy
部署网络组件
Calico是一个纯三层的数据中心网络方案,是目前Kubernetes主流的网络方案。
部署Calico:参考官网: https://docs.projectcalico.org/getting-started/kubernetes/self-managed-onprem/onpremises
1
2
3kubectl apply -f calico.yaml
kubectl get pods -n kube-system等Calico Pod都Running,节点也会准备就绪:
1
2
3
4kubectl get node
NAME STATUS ROLES AGE VERSION
k8s-master Ready <none> 37m v1.20.4yaml文件如下:
1
2
3
4
5
6
7
8
9
10
11
12
13
14
15
16
17
18
19
20
21
22
23
24
25
26
27
28
29
30
31
32
33
34
35
36
37
38
39
40
41
42
43
44
45
46
47
48
49
50
51
52
53
54
55
56
57
58
59
60
61
62
63
64
65
66
67
68
69
70
71
72
73
74
75
76
77
78
79
80
81
82
83
84
85
86
87
88
89
90
91
92
93
94
95
96
97
98
99
100
101
102
103
104
105
106
107
108
109
110
111
112
113
114
115
116
117
118
119
120
121
122
123
124
125
126
127
128
129
130
131
132
133
134
135
136
137
138
139
140
141
142
143
144
145
146
147
148
149
150
151
152
153
154
155
156
157
158
159
160
161
162
163
164
165
166
167
168
169
170
171
172
173
174
175
176
177
178
179
180
181
182
183
184
185
186
187
188
189
190
191
192
193
194
195
196
197
198
199
200
201
202
203
204
205
206
207
208
209
210
211
212
213
214
215
216
217
218
219
220
221
222
223
224
225
226
227
228
229
230
231
232
233
234
235
236
237
238
239
240
241
242
243
244
245
246
247
248
249
250
251
252
253
254
255
256
257
258
259
260
261
262
263
264
265
266
267
268
269
270
271
272
273
274
275
276
277
278
279
280
281
282
283
284
285
286
287
288
289
290
291
292
293
294
295
296
297
298
299
300
301
302
303
304
305
306
307
308
309
310
311
312
313
314
315
316
317
318
319
320
321
322
323
324
325
326
327
328
329
330
331
332
333
334
335
336
337
338
339
340
341
342
343
344
345
346
347
348
349
350
351
352
353
354
355
356
357
358
359
360
361
362
363
364
365
366
367
368
369
370
371
372
373
374
375
376
377
378
379
380
381
382
383
384
385
386
387
388
389
390
391
392
393
394
395
396
397
398
399
400
401
402
403
404
405
406
407
408
409
410
411
412
413
414
415
416
417
418
419
420
421
422
423
424
425
426
427
428
429
430
431
432
433
434
435
436
437
438
439
440
441
442
443
444
445
446
447
448
449
450
451
452
453
454
455
456
457
458
459
460
461
462
463
464
465
466
467
468
469
470
471
472
473
474
475
476
477
478
479
480
481
482
483
484
485
486
487
488
489
490
491
492
493
494
495
496
497
498
499
500
501
502
503
504
505
506
507
508
509
510
511
512
513
514
515
516
517
518
519
520
521
522
523
524
525
526
527
528
529
530
531
532
533
534
535
536
537
538
539
540
541
542
543
544
545
546
547
548
549
550
551
552
553
554
555
556
557
558
559
560
561
562
563
564
565
566
567
568
569
570
571
572
573
574
575
576
577
578
579
580
581
582
583
584
585
586
587
588
589
590
591
592
593
594
595
596---
# Source: calico/templates/calico-etcd-secrets.yaml
# The following contains k8s Secrets for use with a TLS enabled etcd cluster.
# For information on populating Secrets, see http://kubernetes.io/docs/user-guide/secrets/
apiVersion: v1
kind: Secret
type: Opaque
metadata:
name: calico-etcd-secrets
namespace: kube-system
data:
# Populate the following with etcd TLS configuration if desired, but leave blank if
# not using TLS for etcd.
# The keys below should be uncommented and the values populated with the base64
# encoded contents of each file that would be associated with the TLS data.
# Example command for encoding a file contents: cat <file> | base64 -w 0
# etcd-key: null
# etcd-cert: null
# etcd-ca: null
---
# Source: calico/templates/calico-config.yaml
# This ConfigMap is used to configure a self-hosted Calico installation.
kind: ConfigMap
apiVersion: v1
metadata:
name: calico-config
namespace: kube-system
data:
# Configure this with the location of your etcd cluster.
etcd_endpoints: "https://172.16.8.47:2379,https://172.16.8.48:2379,https://172.16.8.49:2379"
# If you're using TLS enabled etcd uncomment the following.
# You must also populate the Secret below with these files.
etcd_ca: "/opt/etcd/ssl/ca.pem" # "/calico-secrets/etcd-ca"
etcd_cert: "/opt/etcd/ssl/server.pem" # "/calico-secrets/etcd-cert"
etcd_key: "/opt/etcd/ssl/server-key.pem" # "/calico-secrets/etcd-key"
# Typha is disabled.
typha_service_name: "none"
# Configure the backend to use.
calico_backend: "bird"
# Configure the MTU to use for workload interfaces and tunnels.
# By default, MTU is auto-detected, and explicitly setting this field should not be required.
# You can override auto-detection by providing a non-zero value.
veth_mtu: "0"
# The CNI network configuration to install on each node. The special
# values in this config will be automatically populated.
cni_network_config: |-
{
"name": "k8s-pod-network",
"cniVersion": "0.3.1",
"plugins": [
{
"type": "calico",
"log_level": "info",
"log_file_path": "/var/log/calico/cni/cni.log",
"etcd_endpoints": "__ETCD_ENDPOINTS__",
"etcd_key_file": "__ETCD_KEY_FILE__",
"etcd_cert_file": "__ETCD_CERT_FILE__",
"etcd_ca_cert_file": "__ETCD_CA_CERT_FILE__",
"mtu": __CNI_MTU__,
"ipam": {
"type": "calico-ipam"
},
"policy": {
"type": "k8s"
},
"kubernetes": {
"kubeconfig": "__KUBECONFIG_FILEPATH__"
}
},
{
"type": "portmap",
"snat": true,
"capabilities": {"portMappings": true}
},
{
"type": "bandwidth",
"capabilities": {"bandwidth": true}
}
]
}
---
# Source: calico/templates/calico-kube-controllers-rbac.yaml
# Include a clusterrole for the kube-controllers component,
# and bind it to the calico-kube-controllers serviceaccount.
kind: ClusterRole
apiVersion: rbac.authorization.k8s.io/v1
metadata:
name: calico-kube-controllers
rules:
# Pods are monitored for changing labels.
# The node controller monitors Kubernetes nodes.
# Namespace and serviceaccount labels are used for policy.
- apiGroups: [""]
resources:
- pods
- nodes
- namespaces
- serviceaccounts
verbs:
- watch
- list
- get
# Watch for changes to Kubernetes NetworkPolicies.
- apiGroups: ["networking.k8s.io"]
resources:
- networkpolicies
verbs:
- watch
- list
---
kind: ClusterRoleBinding
apiVersion: rbac.authorization.k8s.io/v1
metadata:
name: calico-kube-controllers
roleRef:
apiGroup: rbac.authorization.k8s.io
kind: ClusterRole
name: calico-kube-controllers
subjects:
- kind: ServiceAccount
name: calico-kube-controllers
namespace: kube-system
---
---
# Source: calico/templates/calico-node-rbac.yaml
# Include a clusterrole for the calico-node DaemonSet,
# and bind it to the calico-node serviceaccount.
kind: ClusterRole
apiVersion: rbac.authorization.k8s.io/v1
metadata:
name: calico-node
rules:
# The CNI plugin needs to get pods, nodes, and namespaces.
- apiGroups: [""]
resources:
- pods
- nodes
- namespaces
verbs:
- get
- apiGroups: [""]
resources:
- endpoints
- services
verbs:
# Used to discover service IPs for advertisement.
- watch
- list
# Pod CIDR auto-detection on kubeadm needs access to config maps.
- apiGroups: [""]
resources:
- configmaps
verbs:
- get
- apiGroups: [""]
resources:
- nodes/status
verbs:
# Needed for clearing NodeNetworkUnavailable flag.
- patch
---
apiVersion: rbac.authorization.k8s.io/v1
kind: ClusterRoleBinding
metadata:
name: calico-node
roleRef:
apiGroup: rbac.authorization.k8s.io
kind: ClusterRole
name: calico-node
subjects:
- kind: ServiceAccount
name: calico-node
namespace: kube-system
---
# Source: calico/templates/calico-node.yaml
# This manifest installs the calico-node container, as well
# as the CNI plugins and network config on
# each master and worker node in a Kubernetes cluster.
kind: DaemonSet
apiVersion: apps/v1
metadata:
name: calico-node
namespace: kube-system
labels:
k8s-app: calico-node
spec:
selector:
matchLabels:
k8s-app: calico-node
updateStrategy:
type: RollingUpdate
rollingUpdate:
maxUnavailable: 1
template:
metadata:
labels:
k8s-app: calico-node
spec:
nodeSelector:
kubernetes.io/os: linux
hostNetwork: true
tolerations:
# Make sure calico-node gets scheduled on all nodes.
- effect: NoSchedule
operator: Exists
# Mark the pod as a critical add-on for rescheduling.
- key: CriticalAddonsOnly
operator: Exists
- effect: NoExecute
operator: Exists
serviceAccountName: calico-node
# Minimize downtime during a rolling upgrade or deletion; tell Kubernetes to do a "force
# deletion": https://kubernetes.io/docs/concepts/workloads/pods/pod/#termination-of-pods.
terminationGracePeriodSeconds: 0
priorityClassName: system-node-critical
initContainers:
# This container installs the CNI binaries
# and CNI network config file on each node.
- name: install-cni
image: docker.io/calico/cni:v3.18.1
command: ["/opt/cni/bin/install"]
envFrom:
- configMapRef:
# Allow KUBERNETES_SERVICE_HOST and KUBERNETES_SERVICE_PORT to be overridden for eBPF mode.
name: kubernetes-services-endpoint
optional: true
env:
# Name of the CNI config file to create.
- name: CNI_CONF_NAME
value: "10-calico.conflist"
# The CNI network config to install on each node.
- name: CNI_NETWORK_CONFIG
valueFrom:
configMapKeyRef:
name: calico-config
key: cni_network_config
# The location of the etcd cluster.
- name: ETCD_ENDPOINTS
valueFrom:
configMapKeyRef:
name: calico-config
key: etcd_endpoints
# CNI MTU Config variable
- name: CNI_MTU
valueFrom:
configMapKeyRef:
name: calico-config
key: veth_mtu
# Prevents the container from sleeping forever.
- name: SLEEP
value: "false"
volumeMounts:
- mountPath: /host/opt/cni/bin
name: cni-bin-dir
- mountPath: /host/etc/cni/net.d
name: cni-net-dir
- mountPath: /calico-secrets
name: etcd-certs
securityContext:
privileged: true
# Adds a Flex Volume Driver that creates a per-pod Unix Domain Socket to allow Dikastes
# to communicate with Felix over the Policy Sync API.
- name: flexvol-driver
image: docker.io/calico/pod2daemon-flexvol:v3.18.1
volumeMounts:
- name: flexvol-driver-host
mountPath: /host/driver
securityContext:
privileged: true
containers:
# Runs calico-node container on each Kubernetes node. This
# container programs network policy and routes on each
# host.
- name: calico-node
image: docker.io/calico/node:v3.18.1
envFrom:
- configMapRef:
# Allow KUBERNETES_SERVICE_HOST and KUBERNETES_SERVICE_PORT to be overridden for eBPF mode.
name: kubernetes-services-endpoint
optional: true
env:
# The location of the etcd cluster.
- name: ETCD_ENDPOINTS
valueFrom:
configMapKeyRef:
name: calico-config
key: etcd_endpoints
# Location of the CA certificate for etcd.
- name: ETCD_CA_CERT_FILE
valueFrom:
configMapKeyRef:
name: calico-config
key: etcd_ca
# Location of the client key for etcd.
- name: ETCD_KEY_FILE
valueFrom:
configMapKeyRef:
name: calico-config
key: etcd_key
# Location of the client certificate for etcd.
- name: ETCD_CERT_FILE
valueFrom:
configMapKeyRef:
name: calico-config
key: etcd_cert
# Set noderef for node controller.
- name: CALICO_K8S_NODE_REF
valueFrom:
fieldRef:
fieldPath: spec.nodeName
# Choose the backend to use.
- name: CALICO_NETWORKING_BACKEND
valueFrom:
configMapKeyRef:
name: calico-config
key: calico_backend
# Cluster type to identify the deployment type
- name: CLUSTER_TYPE
value: "k8s,bgp"
# Auto-detect the BGP IP address.
- name: IP
value: "autodetect"
# Enable IPIP
- name: CALICO_IPV4POOL_IPIP
value: "Always"
# Enable or Disable VXLAN on the default IP pool.
- name: CALICO_IPV4POOL_VXLAN
value: "Never"
# Set MTU for tunnel device used if ipip is enabled
- name: FELIX_IPINIPMTU
valueFrom:
configMapKeyRef:
name: calico-config
key: veth_mtu
# Set MTU for the VXLAN tunnel device.
- name: FELIX_VXLANMTU
valueFrom:
configMapKeyRef:
name: calico-config
key: veth_mtu
# Set MTU for the Wireguard tunnel device.
- name: FELIX_WIREGUARDMTU
valueFrom:
configMapKeyRef:
name: calico-config
key: veth_mtu
# The default IPv4 pool to create on startup if none exists. Pod IPs will be
# chosen from this range. Changing this value after installation will have
# no effect. This should fall within `--cluster-cidr`.
# - name: CALICO_IPV4POOL_CIDR
# value: "192.168.0.0/16"
# Disable file logging so `kubectl logs` works.
- name: CALICO_DISABLE_FILE_LOGGING
value: "true"
# Set Felix endpoint to host default action to ACCEPT.
- name: FELIX_DEFAULTENDPOINTTOHOSTACTION
value: "ACCEPT"
# Disable IPv6 on Kubernetes.
- name: FELIX_IPV6SUPPORT
value: "false"
# Set Felix logging to "info"
- name: FELIX_LOGSEVERITYSCREEN
value: "info"
- name: FELIX_HEALTHENABLED
value: "true"
securityContext:
privileged: true
resources:
requests:
cpu: 250m
livenessProbe:
exec:
command:
- /bin/calico-node
- -felix-live
- -bird-live
periodSeconds: 10
initialDelaySeconds: 10
failureThreshold: 6
readinessProbe:
exec:
command:
- /bin/calico-node
- -felix-ready
- -bird-ready
periodSeconds: 10
volumeMounts:
- mountPath: /lib/modules
name: lib-modules
readOnly: true
- mountPath: /run/xtables.lock
name: xtables-lock
readOnly: false
- mountPath: /var/run/calico
name: var-run-calico
readOnly: false
- mountPath: /var/lib/calico
name: var-lib-calico
readOnly: false
- mountPath: /calico-secrets
name: etcd-certs
- name: policysync
mountPath: /var/run/nodeagent
# For eBPF mode, we need to be able to mount the BPF filesystem at /sys/fs/bpf so we mount in the
# parent directory.
- name: sysfs
mountPath: /sys/fs/
# Bidirectional means that, if we mount the BPF filesystem at /sys/fs/bpf it will propagate to the host.
# If the host is known to mount that filesystem already then Bidirectional can be omitted.
mountPropagation: Bidirectional
- name: cni-log-dir
mountPath: /var/log/calico/cni
readOnly: true
volumes:
# Used by calico-node.
- name: lib-modules
hostPath:
path: /lib/modules
- name: var-run-calico
hostPath:
path: /var/run/calico
- name: var-lib-calico
hostPath:
path: /var/lib/calico
- name: xtables-lock
hostPath:
path: /run/xtables.lock
type: FileOrCreate
- name: sysfs
hostPath:
path: /sys/fs/
type: DirectoryOrCreate
# Used to install CNI.
- name: cni-bin-dir
hostPath:
path: /opt/cni/bin
- name: cni-net-dir
hostPath:
path: /etc/cni/net.d
# Used to access CNI logs.
- name: cni-log-dir
hostPath:
path: /var/log/calico/cni
# Mount in the etcd TLS secrets with mode 400.
# See https://kubernetes.io/docs/concepts/configuration/secret/
- name: etcd-certs
secret:
secretName: calico-etcd-secrets
defaultMode: 0400
# Used to create per-pod Unix Domain Sockets
- name: policysync
hostPath:
type: DirectoryOrCreate
path: /var/run/nodeagent
# Used to install Flex Volume Driver
- name: flexvol-driver-host
hostPath:
type: DirectoryOrCreate
path: /usr/libexec/kubernetes/kubelet-plugins/volume/exec/nodeagent~uds
---
apiVersion: v1
kind: ServiceAccount
metadata:
name: calico-node
namespace: kube-system
---
# Source: calico/templates/calico-kube-controllers.yaml
# See https://github.com/projectcalico/kube-controllers
apiVersion: apps/v1
kind: Deployment
metadata:
name: calico-kube-controllers
namespace: kube-system
labels:
k8s-app: calico-kube-controllers
spec:
# The controllers can only have a single active instance.
replicas: 1
selector:
matchLabels:
k8s-app: calico-kube-controllers
strategy:
type: Recreate
template:
metadata:
name: calico-kube-controllers
namespace: kube-system
labels:
k8s-app: calico-kube-controllers
spec:
nodeSelector:
kubernetes.io/os: linux
tolerations:
# Mark the pod as a critical add-on for rescheduling.
- key: CriticalAddonsOnly
operator: Exists
- key: node-role.kubernetes.io/master
effect: NoSchedule
serviceAccountName: calico-kube-controllers
priorityClassName: system-cluster-critical
# The controllers must run in the host network namespace so that
# it isn't governed by policy that would prevent it from working.
hostNetwork: true
containers:
- name: calico-kube-controllers
image: docker.io/calico/kube-controllers:v3.18.1
env:
# The location of the etcd cluster.
- name: ETCD_ENDPOINTS
valueFrom:
configMapKeyRef:
name: calico-config
key: etcd_endpoints
# Location of the CA certificate for etcd.
- name: ETCD_CA_CERT_FILE
valueFrom:
configMapKeyRef:
name: calico-config
key: etcd_ca
# Location of the client key for etcd.
- name: ETCD_KEY_FILE
valueFrom:
configMapKeyRef:
name: calico-config
key: etcd_key
# Location of the client certificate for etcd.
- name: ETCD_CERT_FILE
valueFrom:
configMapKeyRef:
name: calico-config
key: etcd_cert
# Choose which controllers to run.
- name: ENABLED_CONTROLLERS
value: policy,namespace,serviceaccount,workloadendpoint,node
volumeMounts:
# Mount in the etcd TLS secrets.
- mountPath: /calico-secrets
name: etcd-certs
readinessProbe:
exec:
command:
- /usr/bin/check-status
- -r
volumes:
# Mount in the etcd TLS secrets with mode 400.
# See https://kubernetes.io/docs/concepts/configuration/secret/
- name: etcd-certs
secret:
secretName: calico-etcd-secrets
defaultMode: 0400
---
apiVersion: v1
kind: ServiceAccount
metadata:
name: calico-kube-controllers
namespace: kube-system
---
# This manifest creates a Pod Disruption Budget for Controller to allow K8s Cluster Autoscaler to evict
apiVersion: policy/v1beta1
kind: PodDisruptionBudget
metadata:
name: calico-kube-controllers
namespace: kube-system
labels:
k8s-app: calico-kube-controllers
spec:
maxUnavailable: 1
selector:
matchLabels:
k8s-app: calico-kube-controllers
---
# Source: calico/templates/calico-typha.yaml
---
# Source: calico/templates/configure-canal.yaml
---
# Source: calico/templates/kdd-crds.yaml授权apiserver访问kubelet
应用场景:例如kubectl logs
1
2
3
4
5
6
7
8
9
10
11
12
13
14
15
16
17
18
19
20
21
22
23
24
25
26
27
28
29
30
31
32
33
34
35
36
37
38
39cat > apiserver-to-kubelet-rbac.yaml << EOF
apiVersion: rbac.authorization.k8s.io/v1
kind: ClusterRole
metadata:
annotations:
rbac.authorization.kubernetes.io/autoupdate: "true"
labels:
kubernetes.io/bootstrapping: rbac-defaults
name: system:kube-apiserver-to-kubelet
rules:
- apiGroups:
- ""
resources:
- nodes/proxy
- nodes/stats
- nodes/log
- nodes/spec
- nodes/metrics
- pods/log
verbs:
- "*"
---
apiVersion: rbac.authorization.k8s.io/v1
kind: ClusterRoleBinding
metadata:
name: system:kube-apiserver
namespace: ""
roleRef:
apiGroup: rbac.authorization.k8s.io
kind: ClusterRole
name: system:kube-apiserver-to-kubelet
subjects:
- apiGroup: rbac.authorization.k8s.io
kind: User
name: kubernetes
EOF
kubectl apply -f apiserver-to-kubelet-rbac.yaml
新增 node 节点
拷贝已部署好的Node相关文件到新节点
1
2
3
4ansible node -m copy -a "src=/opt/kubernetes dest=/opt/"
ansible node -m copy -a "src=/usr/lib/systemd/system/kube-proxy.service dest=/usr/lib/systemd/system/kube-proxy.service"
ansible node -m copy -a "src=/usr/lib/systemd/system/kubelet.service dest=/usr/lib/systemd/system/kubelet.service"
ansible node -m copy -a "src=/opt/kubernetes/ssl/ca.pem dest=/opt/kubernetes/ssl/ca.pem"删除kubelet证书和kubeconfig文件
1
2
3ansible node -m file -a "path=/opt/kubernetes/cfg/kubelet.kubeconfig state=absent"
rm -f /opt/kubernetes/ssl/kubelet*注:这几个文件是证书申请审批后自动生成的,每个Node不同,必须删除修改主机名
1
2
3
4
5
6vi /opt/kubernetes/cfg/kubelet.conf
--hostname-override=k8s-02
vi /opt/kubernetes/cfg/kube-proxy-config.yml
hostnameOverride: k8s-02启动并设置开机启动
1
2
3
4systemctl daemon-reload
systemctl start kubelet kube-proxy
systemctl enable kubelet kube-proxy在Master上批准新Node kubelet证书申请
1
2
3
4
5
6
7
8# 查看证书请求
kubectl get csr
NAME AGE SIGNERNAME REQUESTOR CONDITION
node-csr-4zTjsaVSrhuyhIGqsefxzVoZDCNKei-aE2jyTP81Uro 89s kubernetes.io/kube-apiserver-client-kubelet kubelet-bootstrap Pending
# 授权请求
kubectl certificate approve node-csr-4zTjsaVSrhuyhIGqsefxzVoZDCNKei-aE2jyTP81Uro查看node 状态
1
2
3
4
5kubectl get node
NAME STATUS ROLES AGE VERSION
k8s-01 Ready <none> 47m v1.20.4
k8s-02 Ready <none> 6m49s v1.20.4
部署CoreDNS
CoreDNS用于集群内部Service名称解析。
1
2
3
4
5
6kubectl apply -f coredns.yaml
kubectl get pods -n kube-system
NAME READY STATUS RESTARTS AGE
coredns-5ffbfd976d-j6shb 1/1 Running 0 32sDNS解析测试
1
2
3
4
5
6
7
8
9
10kubectl run -it --rm dns-test --image=busybox:1.28.4 sh
If you don't see a command prompt, try pressing enter.
/ # nslookup kubernetes
Server: 10.0.0.2
Address 1: 10.0.0.2 kube-dns.kube-system.svc.cluster.local
Name: kubernetes
Address 1: 10.0.0.1 kubernetes.default.svc.cluster.local解析没问题。至此一个单Master集群就搭建完成了!服务器配置较高,可继续扩容多Master集群!
CoreDNS YAML 文件如下:1
2
3
4
5
6
7
8
9
10
11
12
13
14
15
16
17
18
19
20
21
22
23
24
25
26
27
28
29
30
31
32
33
34
35
36
37
38
39
40
41
42
43
44
45
46
47
48
49
50
51
52
53
54
55
56
57
58
59
60
61
62
63
64
65
66
67
68
69
70
71
72
73
74
75
76
77
78
79
80
81
82
83
84
85
86
87
88
89
90
91
92
93
94
95
96
97
98
99
100
101
102
103
104
105
106
107
108
109
110
111
112
113
114
115
116
117
118
119
120
121
122
123
124
125
126
127
128
129
130
131
132
133
134
135
136
137
138
139
140
141
142
143
144
145
146
147
148
149
150
151
152
153
154
155
156
157
158
159
160
161
162
163
164
165
166
167
168
169
170
171
172
173
174
175
176
177
178
179
180
181
182
183
184
185
186
187
188
189
190
191
192
193
194
195
196
197
198
199
200
201
202
203
204
205
# Warning: This is a file generated from the base underscore template file: coredns.yaml.base
apiVersion: v1
kind: ServiceAccount
metadata:
name: coredns
namespace: kube-system
labels:
kubernetes.io/cluster-service: "true"
addonmanager.kubernetes.io/mode: Reconcile
---
apiVersion: rbac.authorization.k8s.io/v1
kind: ClusterRole
metadata:
labels:
kubernetes.io/bootstrapping: rbac-defaults
addonmanager.kubernetes.io/mode: Reconcile
name: system:coredns
rules:
- apiGroups:
- ""
resources:
- endpoints
- services
- pods
- namespaces
verbs:
- list
- watch
- apiGroups:
- ""
resources:
- nodes
verbs:
- get
---
apiVersion: rbac.authorization.k8s.io/v1
kind: ClusterRoleBinding
metadata:
annotations:
rbac.authorization.kubernetes.io/autoupdate: "true"
labels:
kubernetes.io/bootstrapping: rbac-defaults
addonmanager.kubernetes.io/mode: EnsureExists
name: system:coredns
roleRef:
apiGroup: rbac.authorization.k8s.io
kind: ClusterRole
name: system:coredns
subjects:
- kind: ServiceAccount
name: coredns
namespace: kube-system
---
apiVersion: v1
kind: ConfigMap
metadata:
name: coredns
namespace: kube-system
labels:
addonmanager.kubernetes.io/mode: EnsureExists
data:
Corefile: |
.:53 {
log
errors
health {
lameduck 5s
}
ready
kubernetes cluster.local in-addr.arpa ip6.arpa {
pods insecure
fallthrough in-addr.arpa ip6.arpa
ttl 30
}
prometheus :9153
forward . /etc/resolv.conf
cache 30
loop
reload
loadbalance
}
---
apiVersion: apps/v1
kind: Deployment
metadata:
name: coredns
namespace: kube-system
labels:
k8s-app: kube-dns
kubernetes.io/cluster-service: "true"
addonmanager.kubernetes.io/mode: Reconcile
kubernetes.io/name: "CoreDNS"
spec:
# replicas: not specified here:
# 1. In order to make Addon Manager do not reconcile this replicas parameter.
# 2. Default is 1.
# 3. Will be tuned in real time if DNS horizontal auto-scaling is turned on.
strategy:
type: RollingUpdate
rollingUpdate:
maxUnavailable: 1
selector:
matchLabels:
k8s-app: kube-dns
template:
metadata:
labels:
k8s-app: kube-dns
annotations:
seccomp.security.alpha.kubernetes.io/pod: 'runtime/default'
spec:
priorityClassName: system-cluster-critical
serviceAccountName: coredns
tolerations:
- key: "CriticalAddonsOnly"
operator: "Exists"
nodeSelector:
kubernetes.io/os: linux
containers:
- name: coredns
image: lizhenliang/coredns:1.6.7
imagePullPolicy: IfNotPresent
resources:
limits:
memory: 512Mi
requests:
cpu: 100m
memory: 70Mi
args: [ "-conf", "/etc/coredns/Corefile" ]
volumeMounts:
- name: config-volume
mountPath: /etc/coredns
readOnly: true
ports:
- containerPort: 53
name: dns
protocol: UDP
- containerPort: 53
name: dns-tcp
protocol: TCP
- containerPort: 9153
name: metrics
protocol: TCP
livenessProbe:
httpGet:
path: /health
port: 8080
scheme: HTTP
initialDelaySeconds: 60
timeoutSeconds: 5
successThreshold: 1
failureThreshold: 5
readinessProbe:
httpGet:
path: /ready
port: 8181
scheme: HTTP
securityContext:
allowPrivilegeEscalation: false
capabilities:
add:
- NET_BIND_SERVICE
drop:
- all
readOnlyRootFilesystem: true
dnsPolicy: Default
volumes:
- name: config-volume
configMap:
name: coredns
items:
- key: Corefile
path: Corefile
---
apiVersion: v1
kind: Service
metadata:
name: kube-dns
namespace: kube-system
annotations:
prometheus.io/port: "9153"
prometheus.io/scrape: "true"
labels:
k8s-app: kube-dns
kubernetes.io/cluster-service: "true"
addonmanager.kubernetes.io/mode: Reconcile
kubernetes.io/name: "CoreDNS"
spec:
selector:
k8s-app: kube-dns
clusterIP: 10.0.0.2
ports:
- name: dns
port: 53
protocol: UDP
- name: dns-tcp
port: 53
protocol: TCP
- name: metrics
port: 9153
protocol: TCP
可视化集群管理
推荐使用kuboard
NFS 安装教程(kuboard官网有详细教程)
执行以下命令安装 nfs 服务器所需的软件包
1
yum install -y rpcbind nfs-utils执行命令 vim /etc/exports,创建 exports 文件,文件内容如下:
1
/root/nfs_root/ *(insecure,rw,sync,no_root_squash)执行以下命令,启动 nfs 服务
1
2
3
4
5
6
7
8
9# 创建共享目录,如果要使用自己的目录,请替换本文档中所有的 /root/nfs_root/
mkdir /root/nfs_root
systemctl enable rpcbind
systemctl enable nfs-server
systemctl start rpcbind
systemctl start nfs-server
exportfs -r检查配置是否生效
1
2
3exportfs
# 输出结果如下所示
/root/nfs_root /root/nfs_rootingress安装(参照kuboard教程)
本博客所有文章除特别声明外,均采用 CC BY-SA 4.0 协议 ,转载请注明出处!